PHOTOGRAPHY STUDIO: LIGHTING TECHNIQUES AND EQUIPMENT PRACTICE
To practice new lighting techniques with new lighting equipment, our photography class utilised the University's photographic studio, which included a white infinity curve for a professional photographic backdrop, black curtain backdrops, and plenty of space to organise other equipment.
 |
| Alisha and I setting up a 300w Redhead light. |
 |
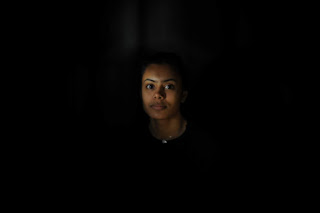
| Myself capturing the shot shown in the first image in this post. |
 |
| Behind the camera showing Alisha posing in front of a Redhead light. |
We practised using a different camera lens, 50mm (compared to 16-85mm) which will provide a smaller focal length for wider shots, perfect for intimate portraits. I used a basic photo tripod for all the photos I shot, to ensure secure stability for all my shots, particularly important when using a fast shutter speed to
The above photos show my experiment using the 50mm lens against a black curtain backdrop and one 300w Redhead Light.
At first, you can see that the Redhead light was too intense, the metal shutters around the light too open. By making the shutter speed slightly faster, and by reducing the opening of these shutters to allow only a slither of light through, I was able to control the direction of light onto my subjects' face and shoulder, seen in the second photo. Although the light was positioned to the left of the camera, I was able to use a silver metallic reflector shield to reflect cold light back onto the subject from the right hand side, illuminating the subjects facial features in an effective yet subtle way.
Still using the black curtain backdrop, I then practised using another, more open and intense light, but with the shutter speed set fast enough as to not over expose the image. I also adjusted the white balance setting on the camera, increasing the setting to around 7,000k (Kelvin), to create a very warm, golden light effect. This effect was emphasised by the use of a gold metallic reflector shield. I also directed my subject to pose in a defiant, radiant way to reflect the mood of the light colour.
I continued to experiment with the placement/angle of the Redhead light and the consequent direction of the light fall on the subject. I adjusted the light to focus on particular features of the subject, such as left shoulder, upper body, and collar bone, to isolate these parts and allow the warm light to exaggerate and highlight the shapes made by the shadows of these features.
I very much like the comparison of the portrait images produced with cooler, silvery light to those produced using a higher Kelvin white balance setting. The juxtaposition of these images and the consequent emotions they evoke is something which I plan to investigate further in my practice and project.
One of my favourite images produced from this shoot is the last large image above. To achieve this, I positioned the Redhead light directly above the subject, who is sat on a chair, head bowed. The high white balance setting again producing a warm light effect (7000k) with shutter speed fast, ISO slightly increased to capture the light effectively (ISO 200). After finding the right angle placement of the light and the subject, I was able to achieve the last image. I love the effect of the falling light highlighting my subjects muscular back, the shadow creating a mesmerising pattern.
Using a similar lighting technique, I wanted to experiment with fast shutter speed. Positioning the Redhead light directly behind the subject, and with the subject throwing her hair back into the air, I was able to capture this movement mid-whip, capturing the illumination of the subjects hair. This has an almost fire effect, like the subjects hair is up in flames. Using the photo tripod really helped me here, adding extra stability helping to erase the error of blurred or unfocused images.
I then changed to use the white infinity curve backdrop. This creates a completely different effect, even when using the same equipment (Redhead light, 50mm lens and tripod).
The white background allows the light to reflect more, and with a bigger space to work with, the positioning of the light in relation to the subject and the white backdrop can create interesting and bold shadows and shapes.
The first 2 photographs are shot using a vibrant blue coloured gel overlay, a transparent coloured film covering the bulb of the Redhead light to change the colour of the light projected. The following 3 photographs are shot using a mid-grey coloured gel - the white balance remained neutral (5000k) during this change of gel colour.
I thoroughly enjoyed practising these different lighting techniques. I found the Redhead lights to be extremely effective and useful, in the way the intensity of light is easily adjusted through the shutters, and are easily portable on their own stands allowing for ease of distance adjustment, too.
I particularly liked the effect generated from using the white infinity curve. It allows the colour and shadows of the image to be emphasised and shown most effectively. I will strongly consider utilising the white curve for my final project.


Comments
Post a Comment